Wednesday, March 23, 2016

Meadow Clover and Dogwood Blossoms by Memory Box card to share

Hi Friends and, followers,

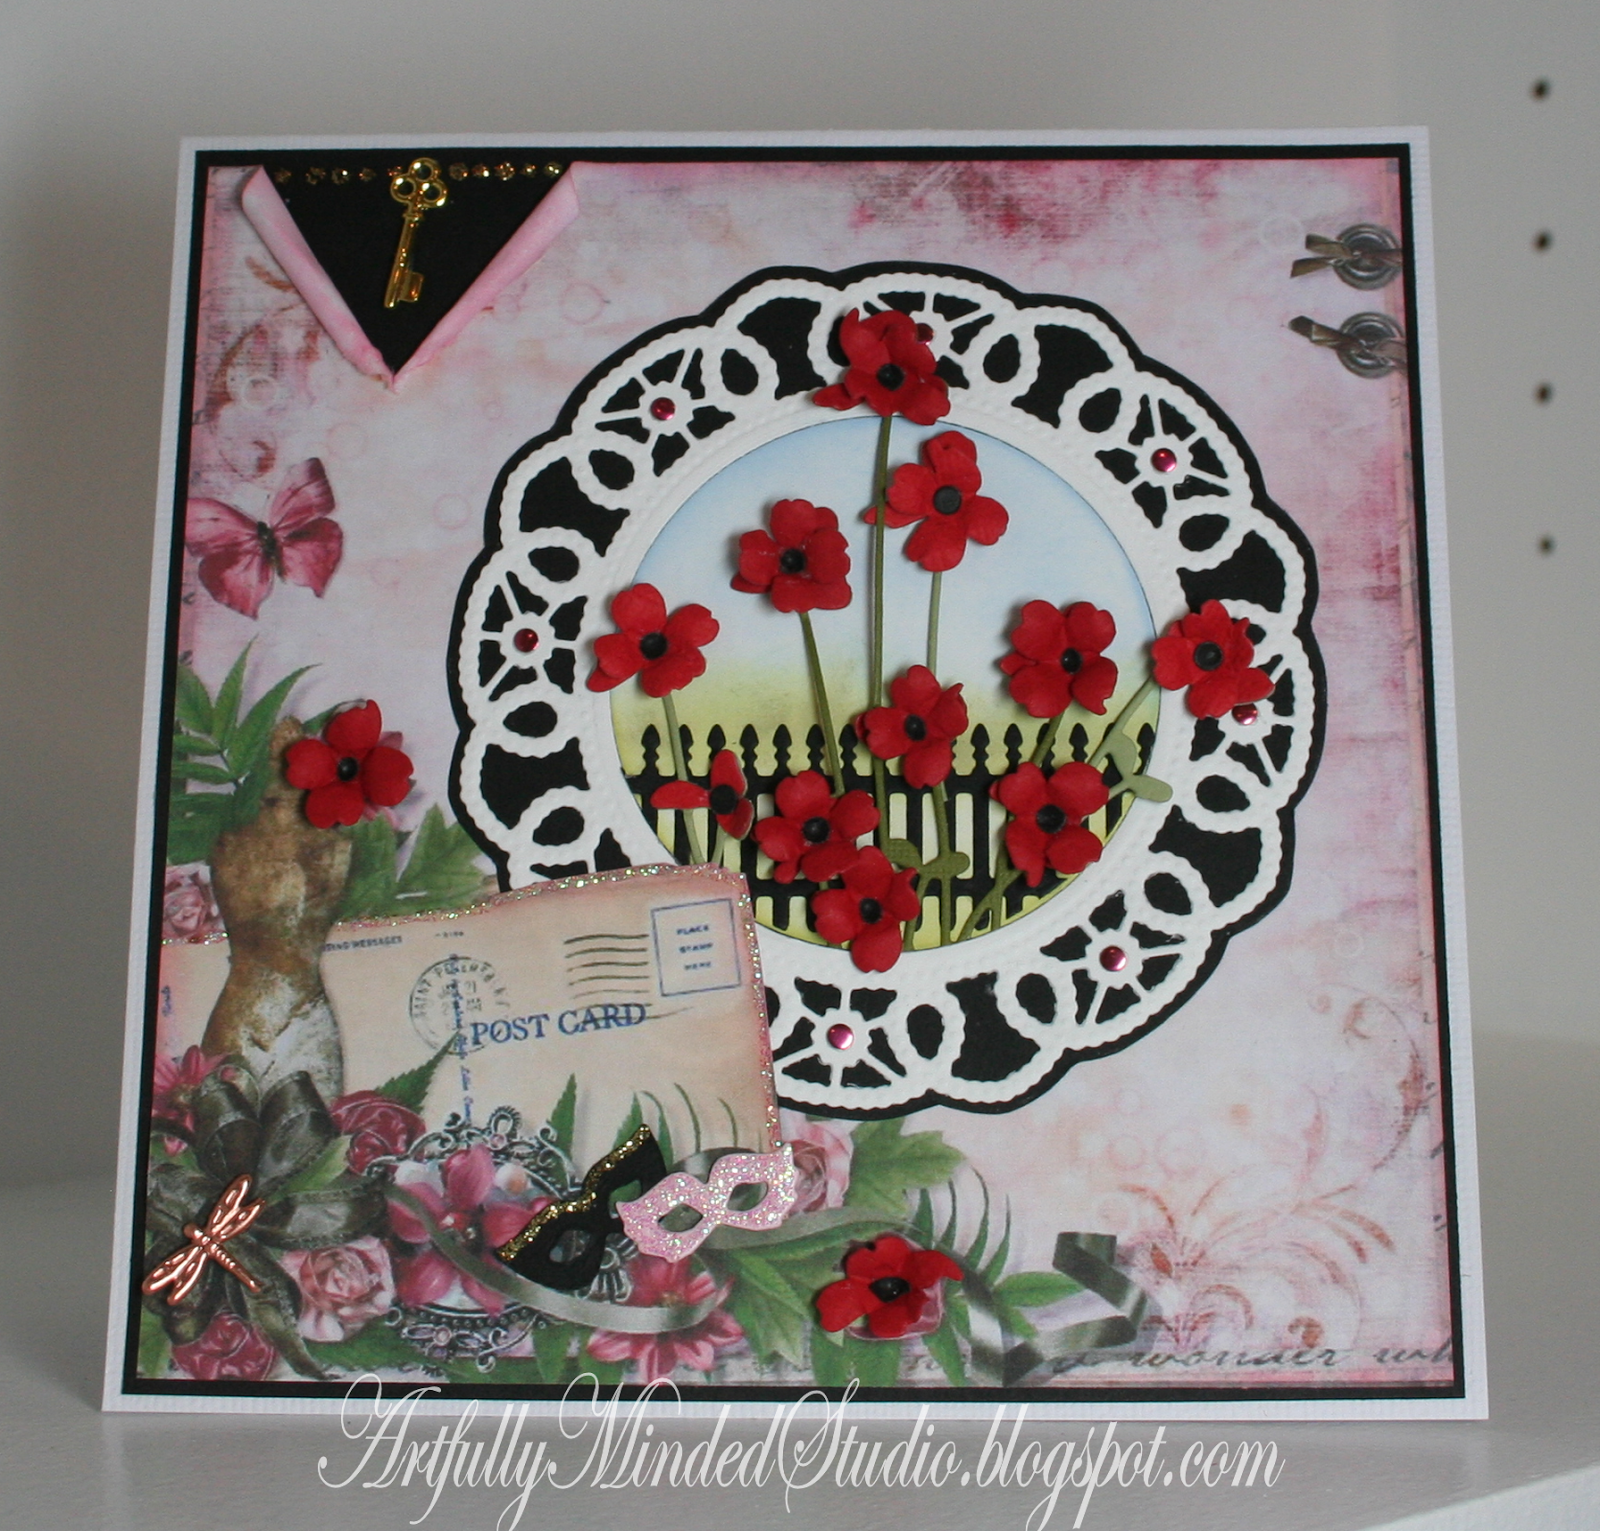
Today I am sharing a card that came about by trying to make another flower with what was originally purposed as Meadow Clover and Dogwood Blossoms and turn them into looking like a field of Spring Poppies.  I hope you like it.  I will give you a description of all products I have used for this card under the first photo.  Enjoy!

Here it is:

Material used:
Memory Box/Poppystamp - Meadow Clover 1206
Memory Box/Poppystamp - Dogwood Blossoms 1436
Memory Box/Poppystamp - Masquerage Masks 1357
Marianne Designs - LR0388
Impression Obsession - Gate DIE028-J
Stickles - Diamond
Embellishments:  Dragonfly brad, key and, red nail heads, Masquerade Masks.
Background paper - found on Pinterest and printed to fit my card


I agree that several of my cards are using many dies out there.  Keep a creative mind when you see my cards, I often see cards that has so many dies, there is no end to them, but try and adapt your own cards with your already collected own dies to adapt to your own interpretation.  Pick a theme i.e.: Baby card.... Gather the dies and stamps you have for this specific topic and then decide what color of card you can use for the base and, expand to 2 other colors.  3 complimentary colors is key, it's always best unless you are going for a Monochromatic style card, which is also gorgeous. 
 
Decide what you definitely don't want to use on your card and eliminate gradually to keep just a very few to use.  Build your card and have a visual plan.  It will make your life much easier.  Have fun with it.
I never adhere permanently anything that will go on my card until I am sure "This is it".  When in doubt, walk away and come back to it, you will know if you like it or if there is something missing or something to omit.  When your eyes are away from your project for a few minutes, something will pop and say "Add this or Remove that" then try again.  A little goes a long way, but too much on the other hand, will distract the eyes from the real theme (look) you are after.  I hope this helps


I hope you have a great day, make it memorable!
Hugs
Nicole

Monday, March 21, 2016

Heartfelt creations Sunrise Lily & Regal borders card

Hi Friends and followers,

Here I am, as promised, I have a fresh new card to share with you.  I hope it makes you smile as I sure was smiling once I saw it was coming to life for me.  These are fun dies with matching stamps to work with.  If you enjoy shaping, cupping flower shapes 101 this Heartfelt creations is for you.  You can cut the flowers alone without stamping them.  You can also stamp and cut all on the same die.  So, so, time saving.  I really enjoy the fact that, all is left to do is, shaping flowers, adding whether it's a center piece of choice, such as half pearls or yet, stamens as two of them are included with your die as well.  Have a look, you will become hooked too!

I have a card I am working on to share with you soon.  Another one of my cards with Heartfelt Creations stamps and dies.  Part of their recently out collection called "Sugar Hollow" if you are into Owls, you might enjoy this one.  I am getting back into more decoupaging my stamps.  Some of you who happened to know me almost 10 years ago, I have made quite a few Decoupage sheets 4,000+ of them.  I am not saying I will do this again as my free time is really limited.  But I can share what I can do with my own stamps, embellished with some cute flowers and backgrounds.  I hope you will enjoy it from time to time.  Keep an eye for the Owl's nest!

So today is about my Sunrise Lily card:


Material used:
HCD1-779 Regal Borders and Pockets die set
HCD1-787 Sunrise Lily die
HCPC-3720 Sunrise Lily Cling Stamp
Stamens from my existing stash
Half pearls
Marianne Designs - Leaves die LR0192
Happy Birthday Sentiment (held by a toothpick) by Make an Impression
Memory Box - Grove Branch 98311
Stickles - Diamond


If you want to see how to make a nice border edge(s) go to Emma Lou's Video on Youtube.

 
I hope this was helpful and inspiring.  I know this video was for me in many ways.  We get what we need in videos and we grow as we learn every day.  One of the reasons why I love crafting so much!
 
 
Have a fantastic day, live it as if it was your last
Hugs
Nicole


Resuming blog posts this week

Hi Friends, followers,

Thank you for being patient.  I have had a nice week to recuperate and feel a little more back into my own busy schedule.  We all know when not feeling good for a few days, the trail of work left to do when we get back on our feet, right?  That's where I am now. 

I will post a new card this week.  Need to take photos and I will be back to share.  Thank you for the get well wishes from closer friends and some forever online friends.  I made me feel like I am also at risk, who ever said, aging was a walk in the park, I can't agree to that as yes we have good days, few and far in between LOL.  But working on staying fit so my ticker doesn't give me more worries.

Have a fantastic week!
Hugs
Nicole xox

Saturday, March 12, 2016

Resting for a few days

Hi friends,

I ran out of cards to share, but I have a much needed rest to take since I have had some health issues and still have some unsolved.  Nothing totally serious but enough for me to sit back and let the pain subside.

We have a Stamp Show in Albuquerque, NM this weekend so Linda and I were there this morning, Thank you for driving us there.  I still wanted to go just as long as I would sit regularly and rest up, I was encouraged to do so LOL. 

If you are liking the Heartfelt Creations dies and stamp sets, I can tell you how excited I am to use 5 sets to play with.  I can't wait to play with what I purchased at the show.  If you have seen the Owls and Frog sets I have gotten some of the two themes.  I also have the Lilies and will make a card soon with the gorgeous lilies.

So as soon as I feel better I will be back at sharing cards.  I hope a week is all I will need.  Thank you for understanding, and hope to be back to my old routine in no time. 

Geri and Randy, it was so good to see you at the show today.

I will be back before you know it.

Have a great day and thanks for visiting today
Hugs
Nicole


Friday, March 11, 2016

Acetate flowers on a B&W card

Hi Friends,

If you have been a card maker for years, you are probably like me, I like to find some new techniques to impress my creativity possibilities.

One day I had my usual craft tools on my table and there was some scrap acetate part of packaging I had just opened and thought, what can I make with this?  Flowers? Perhaps?


Material needed for the Acetate flowers
*Spellbinders Rose creations by Donna Salazar or any flower die you have in your stash of 1 inch or more diameter, too small of a flower will make it difficult to shape and decorate)
(Cut as many acetate flowers you will need and as many layers as well.)
*Acetate that is not too thick.  (Try to cut one or two and see if it will come out of the die or use a shim to make sure it will cut all flowers uniformly.  All machines are different.)
*Any Alcohol based markers, fine tip is preferable.
*Any good white markers, fine tip is preferable.  (White Sharpie, water based will do)
*Micron extra fine tip 02 (for white card stock dotting)
*Black and White card stock
*Stamen die cuts or punches
*Sun punch (small) for flower center
 
I will only concentrate on the flower part of this card
 

How to...
For one flower
Cut about 3 to 4 layers. 
Depending on how many sizes you have on your die, you will need to plan to alternate from card stock flower layer to an acetate layer and so on.  On the photo above, the white rose.  When starting with one flower at a time you will see how easy this all comes together.
 
All Acetate layers are edge marked around all the petals with a black alcohol ink based.  Carefully lining up following all curves.  It will dry quite fast.
 
Next step is to use your white marker (fine tip) and go around all petals again, but this time you are dotting on top of your black lines as per seen on the photo.
 
 
With the white rose layers make some dots of any style you choose and appeals to you.  On my flower I decided to just dot the borders of each petal.  Take your time so your dotting will look regular.

On black rose layers dot with white marker in a way that appeals to you.
I used some paper stamens on some flowers and some sun, from punches I had on hand but you can really make this your own by using what you have in your own stash.  Any small flower die or punch can be used in the flower center

The black frame was a Spellbinders die S4-414 Captivating Squares (not recent) or use any shape of your choice to nest your beautiful flowers.  I used some corners by Cheery Lynn Designs.  As for the leaves I used some dies from stash.
 
Feel free to ask questions.  Thanks for visiting...and comments makes me smile
 
Have a fun day!
Making flowers is the best way for me to relax and get the best ME time, each time.
Give it a try, but, be careful, it's addictive.  I usually make dozens ahead of time for a future card.
 
Hugs
Nicole


Thursday, March 10, 2016

Moki's up to date photos

Hi Friends,

Today I am taking this post to show you my little Morkie dog called Moki.  For those of you who have not gone as far as last year's blogs, I have gotten him when he was 10 weeks old a tiny little puppy who had his whole life ahead of him filled with learning and training.  He is now 18 months into his comfortable life of being loved (spoiled).  We think he is happy.  If dogs could talk right?

So here he is:

Ahhhhhh, he is not so happy to have been woken up for a photo session poor guy


Happier pictures of him will be posted soon.  He had his trimming session today, so not a best day for him to be asked to be still for a silly photo session, if you know what I mean.

I have had many requests to show him off since he had been camera shy for a few months now.  So he posed today for all of you who are interested to see him.  I took an hour a few days ago to trim him down as his fur was way too long it was always tangling up and he hates being brushed when it gets out of control.  For the first time, ever, I was able to trim him from side to side without chasing him around the table top.  What a nice change.  That means less fur irregularities, I am getting better at it.  When I keep in mind I'm saving at least $60 a month and $11 for his hair trimming, it makes it worthwhile to take one hour and have him to be a good Moki for that time rather than leaving in the hands of strangers for sometimes 3 hours. 

He has allergy issues, but as the Vet suggested, chicken is the most allergenic food for small dogs, rice and so on.  So I am in the process of trying turkey and beef mixed together with loads of good veggies for him into a meat loaf made ahead of time and sliced into daily portions.  It works fabulously as I refuse to feed him store bought food that we never really know what I feed him with. 

I also read on yeast they produce from certain foods, or products we wash dogs with.  There is a lot of tricks out there to remedy the intense scratching, what works for him seems to be apple cider vinegar mixed with water 1:1 ratio.  Warm water added to the same amount of vinegar and with a very soft cloth, I saturated the cloth with this formula and rub the areas itching.  Now when I see him scratching, I say, do you want vinegar?  He runs to the area where I keep the vinegar to have me apply more on him.  For best results, apply as needed or every other day.  Also add a small drop of apple cider vinegar in the water they drink. 

It could also be dry skin too.  Here in New Mexico, it is known to be so dry, let's face it, the desert is even difficult for human skin so, imagine a small animal walking in the dead heat of Summer, when the sun is affecting us too, what it does to them, they can't speak to tell us what's wrong.  When it's too hot we walk when the sun is rising and when it is going to set.  I preserve his little pads on his feet from burning.  For some relief of this type of dryness we use Oatmeal shampoo once a week.  It smells so nice.

Well, I know I had gotten some interest from someone who reads my blog regularly about this type of problem, but a Vet is also a preferable to ask if it seems serious.  Also brushing their fur coat every day is also another good thing to get into the habit of doing.  Moki never liked the brush, he runs away from it but once I get started. he enjoys the free scratching the brush provides for him.

So I am no expert in the canine matters, I can only tell you what I do with my little one to try and help the problems that were addressed on his Vet visits. There are some really good sites where you can read about skin problems for dogs, don't quote me on all of this please.  If you see no improvement, stop what is not working.

Have a fun day!
Hugs
Nicole


Wednesday, March 9, 2016

Spellbinders Labels 46 Decorative elements (Linda's #2 card)

Hi Friends,

Another one of Linda's cards, she is productive and I love it!  It gives me a chance to catch as well.  Thank you Linda for allowing me to share your beautiful cards with everyone visiting my blog.  It is fun to hear that they are really happy I could share my place with you.  Take off your shoes, lay back comfortably and enjoy the fruit of your creative labor.  I hope you will all enjoy, perhaps this will trigger some idea for a next project.

 
Material used
Spellbinders Labels 46 - Decorative Elements S4-494
Spellbinders Curved Squares S4-524
A decoupage flower resides in the middle of the card
Many other dies from mixed companies were used for the rest of the flowers
Martha Stewart's sprig punch, Mirror Silver card, Pattern paper from stash
Half pearls, corners were from an unknown wafer die cut collection, sorry.


Thank you all for visiting.  The more the merrier.  All comments are always appreciated.  So drop a line if you can, questions are also welcome.  See you next time.
 
Have a lovely day!
Hugs
Nicole

Tuesday, March 8, 2016

Spellbinders Labels 46 Decorative Elements card (Linda's)

Hi friends,

Today's card is one of Linda's cards we made 2 weeks ago and finished at home to show and tell the following week.  I find this so much fun as we have no idea what we will end up with.  That is when I have time to finish mine (not always finished) but I always enjoy what Linda made.

I will have another card as she made a second one in different colors, for tomorrow's blog, hoping I get around to that much to show you.  I can't tell how much time I have left from one day to the next, but I try hard!

We have a Stamp Show next Saturday in Albuquerque, NM.  Linda and I can't wait to go see what we can't live without at the show. It is to say the least, a fun day out for the ladies.  I am sure there are such shows all over the place in the USA as I know there are also many of them in England, at least in the Lancashire area.  Theirs is going to be in May.

I know I was at a huge Craft show in Brisbane, Queensland a few years back (2010) with Trish and we had a great time.  Beautiful memories to look back on, that's for sure. There wasn't enough time to visit the whole exhibition in one day.   Hang in there ladies, May will be here soon, for the Lancashire area ladies, you'll see.  :)

So here is Linda's card as I hope you will enjoy it as much as I did when she did the reveal!


Material used
Spellbinders Labels 46 - Decorative Elements S4-494
Spellbinders Rose Creations - Donna Salazar, S5-050
Many other dies from mixed companies were used for the rest of the flowers
Martha Stewart's sprig punch
Bling, corners were from an unknown wafer die cut collection, sorry.

 
Thank you all for stopping by today.  I know some of you don't leave comments, but what matters is that you come and have a look at what I share with you.  Perhaps one day you will have enough time to say Hi.  I would love that.
 
Have a great day everyone!
Hugs
Nicole

Monday, March 7, 2016

Spellbinders die card

Hi Friends,

Today's card to share is from another Spellbinders die set, description of all dies used below first photo.  I had the idea of getting outside of my comfortable box which is usually PINK.  So today, don't be too shocked, I am sharing a grey and silver card.  I thought it looked so pretty.  Hoping the mirror on the photos will not blur the images too much. 


Material used:
Spellbinders Labels 46 Decorative Elements S4-494
Spellbinders Square dies to fit in the center of the card
Corners are by Cheery Lynn Designs.  Lattice corner set
Card stock Grey, White and Mirror Silver
Happy Birthday stamp which I have Silver embossed with heat tool
Half pearls, seam binding ribbon
Paper Punch Tim Holtz (Sizzix) (small) Spikey floral


I hope this card was inspirational.  Sorry about the poor quality photo.  When came the time to take the photos it was getting dark outside and what doesn't help anyone who has tried to take any mirror card photos in the past, it is not easy. 
 
Thank you for stopping in today.  There are more cards coming this week.  Another card from Linda next.  Keep me smiling with your beautiful comments.  Ladies, you are the best!
 
Hugs
Nicole
 

Saturday, March 5, 2016

Spellbinder Triple Flip card #2 (Linda's)

Hi everyone,

Thanks for visiting, today I am sharing another Triple Flip card creator by Spellbinder.  Another one of Linda's creations.  Well done Linda.

Linda and I make similar cards with different colors as we try to adapt our own version of a card with what we want to use for the final presentation.  It's our own show and tell for the following week.  Fun fun fun.  I think it is a fun way to come up with a different card with a personal twist.

So here is Linda's Triple flip card #2, #1 was yesterday's post.

 
Same material as per yesterday's description
Spellbinders Oval Regalia S4-492 (inside oval from set)
Paper used, Stampin Up older collection (double sided paper)
Flowers and leaves were handmade by Linda


Inside flip shown up above.  I was distracted and forgot to take photos of the other 2 flips.
I hope this is inspirational for your next project.  I know I was so thrilled to see her finished card.  If you have time please leave a comment and let her know how you liked her card.
 
Thank you for visiting and welcome to the new followers.
Hugs
Nicole

Friday, March 4, 2016

Spellbinders Triple Flip card (linda's)

Hi friends,

Just a few words of thank you for the comments that were left by you when visiting my blog.  All of them made me smile as you are all so very nice to me.

Today I want to share another card that Linda made recently,  I will from time to time post some of her work as well, she is so talented that I can't just see what she does and not take a photo or two or three of it.  So I hope you will enjoy her work as well and she also reads the blog so if you have any comments on her work please let her know if you have time.

 
Dies needed Spellbinders Card Creator, Triple Flip S6-031
Spellbinders Card Creator 6 X 6 Matting Basics BS6-026
Spellbinders Victorian Medallion Three, S5-224
Memory Box Emory Oval Frame Style No 1255 (inside, second flip)
Paper:  Graphic 45 Easter collection of last year or the year before.
Flowers and leaves from handmade flower stash
Half pearls  

 
The Graphic 45 paper was two sided, both sides were used inside and out.

 
First Flip on top seen up above

 
Second flip up above.  The last flip is the card base fold which can also have some of the paper used to finish it beautifully.  This card is not one I call easy to make, but once we understand where to add the pattern paper, only at the end of the work of the triple flip that the base card will be adhered into position.  Important to know.
 
I hope you enjoyed Linda's card.  Next card will be another Flip card by Linda, then mine should be ready to post next.
 
Thanks for visiting and hope to see you on the next post!
Have a great day everyone.
Hugs
Nicole